
Introduction: Why Speed Curves Changed Video Editing Forever:
If you’ve watched a recent TikTok, Instagram Reel, or YouTube Short with smooth slow-motion transitions into fast-paced action, you’ve likely seen speed curves in action. In 2026, speed curves have become the go-to technique for creating dynamic, professional-looking videos that keep viewers hooked.
But here’s the thing: most creators don’t understand how speed curves actually work. Many treat them like a simple slow-motion toggle—missing out on the creative potential that makes videos truly stand out.
Whether you’re editing a cinematic vlog, creating viral content, or building your filmmaking portfolio, mastering speed curves in CapCut is essential. This guide walks you through everything you need to know—from basic concepts to advanced techniques that’ll have your audience wondering how you created that smooth, movie-like pacing.
In this article, you’ll learn:
What speed curves are and why they matter
Step-by-step tutorial for using CapCut’s speed curve feature
Real-world examples and creative applications
Professional tips to elevate your editing
Troubleshooting common issues
FAQs about speed curves and CapCut
Let’s dive in.
What Are Speed Curves? Understanding the Basics:
Speed curves aren’t just another editing effect—they’re your ticket to creating cinematic motion and professional pacing in your videos.
The Difference Between Speed Curves and Regular Speed Changes:
Most video editors let you speed up or slow down entire clips at a fixed rate. You click, you set the speed to 50%, and the whole thing slows down equally. Basic, right?
Speed curves work differently. They let you control the speed of your clip at different moments. Think of it like drawing a line that tells CapCut “here, go slow, and here, speed up.” This creates smooth, natural transitions between different speeds.
Why Speed Curves Matter in 2026:
Here’s why content creators in 2026 are obsessed with speed curves:
Cinematic storytelling – Create dramatic slow-motion moments that grab attention
Natural transitions – No jarring speed changes; just smooth, flowing motion
Emphasizing moments – Slow down important beats, speed up boring parts
Professional polish – It’s a signature technique of high-quality video content
Audience engagement – Varying pacing keeps viewers from getting bored
Speed curves are what separates amateur edits from content that performs well on algorithmic platforms.
How to Use Speed Curves in CapCut: Step-by-Step Tutorial:
Ready to start using speed curves? Here’s your complete walkthrough.
Step 1: Import Your Footage and Select Your Clip
Open CapCut and create a new project
Tap the + button to import your video
Select the clip you want to edit and add it to your timeline
Tap on the clip in your timeline to select it
Step 2: Access the Speed Controls
With your clip selected, look for the Speed option in the bottom menu
You’ll see Speed listed among editing options (alongside effects, filters, etc.)
Tap Speed to open the speed editing panel
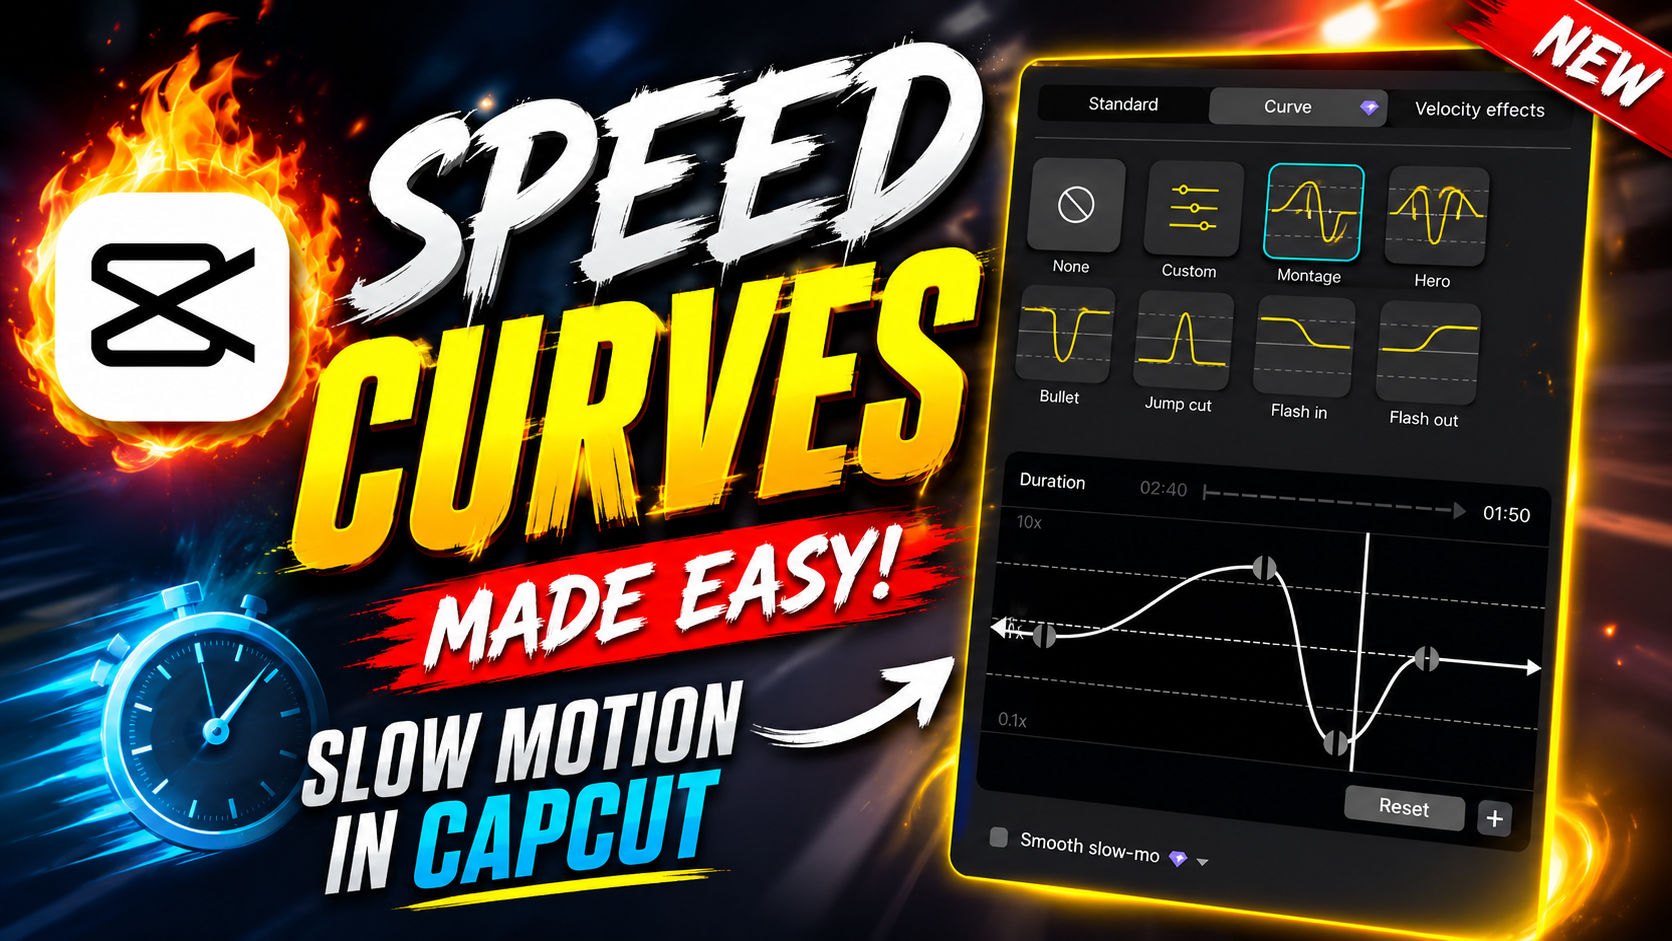
Step 3: Understand the Speed Curve Interface
When you open the Speed control, you'll see:
A horizontal timeline showing your entire clip
A curved line representing your current speed (usually a straight line at the top = normal speed)
Adjustment points (dots) that you can add and drag
Normal speed appears as a straight horizontal line. Dragging the line down means slowing down; dragging it up means speeding up (on some versions, this is reversed).
Step 4: Create Your First Speed Curve
Simple slow-motion effect:
Tap the timeline roughly halfway through your clip to add a control point
On the left side of your curve, drag the line down to create slow motion (try 50% speed)
On the right side, drag the line back up to normal speed
Tap Apply to save your changes
You’ve just created your first speed curve! You’ll see the clip now slows down in the middle and returns to normal speed.
Step 5: Advanced Curve Adjustments
For more sophisticated control:
Add multiple control points along your timeline
Create smooth curves by adjusting each point slightly
Experiment with S-curves (slow-fast-slow) for dramatic effect
Use gradual transitions rather than sharp drops
Pro tip: Watch your video in the preview to see how it flows. Smooth curves look better than jagged changes.
Creative Uses for Speed Curves: Real-World Examples
Speed curves aren’t just a technical feature—they’re a creative tool. Here’s how top creators use them:
Example 1: The Dramatic Build-Up
Slow down during an intense moment (like someone’s facial reaction), then speed it back up. This creates anticipation and emphasis.
Best for: Reactions, reveals, before-and-after transformations, emotional beats
Example 2: The Smooth Transition
Use speed curves to match clips with different frame rates or speeds smoothly. No jumping between speeds—just a natural flow.
Best for: Montages, day-in-the-life videos, travel vlogs, workout routines
Example 3: The Action Ramp
Speed up action sequences, then slow down the payoff. Think of a skateboarder building speed, then doing a trick in slow motion.
Best for: Sports content, pranks, parkour, action clips
Example 4: The Rhythm Sync
Adjust speed curves to match your video’s pacing to your music. Slow down on quiet parts, speed up during drops or beats.
Best for: Music videos, dance content, trend videos, storytelling content
Pro Tips for Perfect Speed Curves in CapCut:
Knowing the basics is one thing. Mastering speed curves takes practice and technique. Here are insider tips from professional editors:
Tip 1: Less Is More:
Don’t add speed curves to every single clip. The most impactful edits use speed curves strategically—on moments that matter. Overusing them makes your video look jittery and unprofessional.
Tip 2: Match Your Audio:
Speed changes in video usually need speed changes in audio too. If your audio feels out of sync with your speed curves, it’ll feel off. Use CapCut’s audio speed controls alongside your video speed curves.
Tip 3: Preview Multiple Times:
Always preview your speed curves in full-screen before finalizing. How they look in the timeline isn’t always how they look in the final video.
Tip 4: Use Reference Points:
If you’re syncing to music, count beats and add control points at musical moments. This creates a professional, music-video feel.
Tip 5: Smooth Out Your Curves:
Avoid sharp angles in your speed curve. Gradual transitions look cinematic. If you see a sharp point, you might need additional control points to smooth it out.
Common Speed Curve Mistakes and How to Fix Them
Mistake 1: Jerky Speed Transitions:
Problem: Speed changes feel abrupt and unnatural.
Solution: Add more control points between your main speed changes. Create a gradual curve instead of a steep angle.
Mistake 2: Speed Changes Don’t Sync with Your Music:
Problem: Video speeds up/slows down at the wrong moment compared to your audio.
Solution: Use CapCut’s audio speed option alongside your video speed curves. Make sure both change at the same points.
Mistake 3: Overusing Speed Effects:
Problem: Your video looks frantic and hard to follow.
Solution: Use speed curves on 2-3 key moments per clip, not every second. Think about what moment deserves emphasis.
Mistake 4: Losing Audio Quality:
Problem: When you slow down video, audio sounds distorted.
Solution: Some creators separate audio and adjust only the video. For important audio, use CapCut’s audio enhancement settings alongside speed adjustments.
CapCut Speed Curves vs. Other Editing Software
If you’re wondering whether CapCut’s speed curve feature compares to professional editing software, here’s the truth: In 2026, CapCut’s speed curve implementation rivals features in Adobe Premiere and Final Cut Pro for most creators’ needs.
CapCut advantages:
Intuitive, tap-and-drag interface
Real-time preview
Mobile-friendly workflow
No expensive subscriptions
Quick rendering times
When you might need professional software:
Advanced color grading alongside speed curves
Extreme precision editing
High-resolution 8K+ editing
Complex multi-layer timelines
For YouTube Shorts, TikToks, Reels, and even short-form vlogs, CapCut’s speed curves are more than sufficient.
FAQs About Speed Curves in CapCut:
Q1: Can I undo a speed curve if I mess up?
Yes. If you’re still in the speed editing panel, tap the undo arrow. If you’ve exited the panel, go back to your clip, tap Speed again, and you can modify or delete the curve. You can also tap and hold on your control points to delete them individually.
Q2: Does using speed curves affect audio quality?
Speed curves primarily affect video playback speed. Audio usually adjusts proportionally, which can sometimes cause pitch issues if you’re slowing down significantly. Use CapCut’s audio editing tools to match if needed, or consider keeping audio at normal speed while varying video speed.
Q3: What’s the maximum speed I can use with speed curves?
CapCut typically allows speed adjustments from 0.1x (very slow) to 4x or higher (very fast). Check your CapCut version, as limits vary slightly between iOS, Android, and desktop versions.
Q4: Can I apply speed curves to audio tracks separately?
Yes. CapCut lets you adjust audio speed independently from video. This is useful if you want to slow down video while keeping music at normal tempo.
Q5: Do speed curves work on all CapCut versions?
Speed curves are available on CapCut’s mobile app and desktop version. Features and interface may vary slightly between platforms. Desktop typically has more advanced controls, while mobile is more streamlined.
Conclusion: Transform Your Videos with Speed Curves:
Speed curves are one of the most powerful tools available to modern creators. They’re the difference between a video that viewers watch passively and one that captures attention and keeps them engaged through pacing and emphasis.
You now have everything you need to start using speed curves in CapCut:
✓ Understanding of how speed curves work
✓ Step-by-step tutorial for implementation
✓ Real-world creative examples
✓ Professional techniques from top editors
✓ Solutions to common problems
Take Your Learning Further:
This blog post covers the fundamentals, but seeing speed curves in action makes everything clearer.
Watch our complete video tutorial on Speed Curves in CapCut where I demonstrate each technique in real-time, show you how to avoid beginner mistakes, and walk through creating professional-grade edits that’ll make your content stand out.
Your Next Steps
Open CapCut and follow the step-by-step tutorial
Start with one speed curve on your next edit
Practice with simple effects before attempting complex curves
Watch your viewers react to better-paced, more engaging content
Remember: the best editors aren’t the ones with the most effects—they’re the ones who know how to use each tool intentionally. Speed curves, when used right, are invisible to your audience. They just feel like your video has better flow, better pacing, and more professional polish.
Start experimenting today, and tag us when you create something amazing with speed curves


Leave a Reply