
How to Master Cinematic Color Grading:
Ever watched a movie and wondered why it just looks different from a regular phone video? It’s not the camera. It’s cinematic color grading. That moody orange-and-teal glow, the soft contrast, the way shadows feel rich instead of flat — all of that is created after filming, in the edit.

The good news is you don’t need a Hollywood budget or years of training to pull this off. In this guide, you’ll learn the basics of cinematic color grading using tools you probably already have access to, plus the exact steps editors follow to get that polished, big-screen look.
What Is Cinematic Color Grading?
Cinematic color grading is the process of adjusting the colors, contrast, and tone of your footage after it’s already been shot. It’s different from basic color correction, which simply fixes white balance and exposure issues.
This style of grading goes further — it’s about creating a mood. Think of the warm golden tones in a romance film, or the cold blue shadows in a thriller. That emotional pull you feel while watching? A huge part of it comes from color choices made in post-production.
Start With Clean Footage Before You Grade
Before jumping into any creative cinematic color grading, you need to fix the basics first. Skipping this step is one of the most common mistakes beginners make.
Fix White Balance
Make sure whites actually look white, not yellow or blue. Most editing software has an auto white balance tool to start with.
Even Out Exposure
Your footage should be neither too dark nor blown out. Use the waveform or histogram tool in your editor to check levels rather than relying on your eyes alone, since screen brightness varies.
Match Shots Across a Scene
If you filmed the same scene with multiple clips, make sure the color and exposure match between them before applying any creative grade.
Best Software for Cinematic Color Grading
You don’t need the most expensive tool — you need the right one for your skill level.
- DaVinci Resolve – Free, industry-standard, and used on real Hollywood productions. Best if you’re serious about learning color grading properly.
- Adobe Premiere Pro – Great if you’re already editing in Premiere; the Lumetri Color panel handles grading well.
- CapCut – Good for mobile creators who want quick cinematic looks without a steep learning curve.
- Final Cut Pro – Solid option for Mac users with built-in color tools.
If you’re serious about this skill long-term, DaVinci Resolve is worth learning since it’s the same software many professional colorists use.
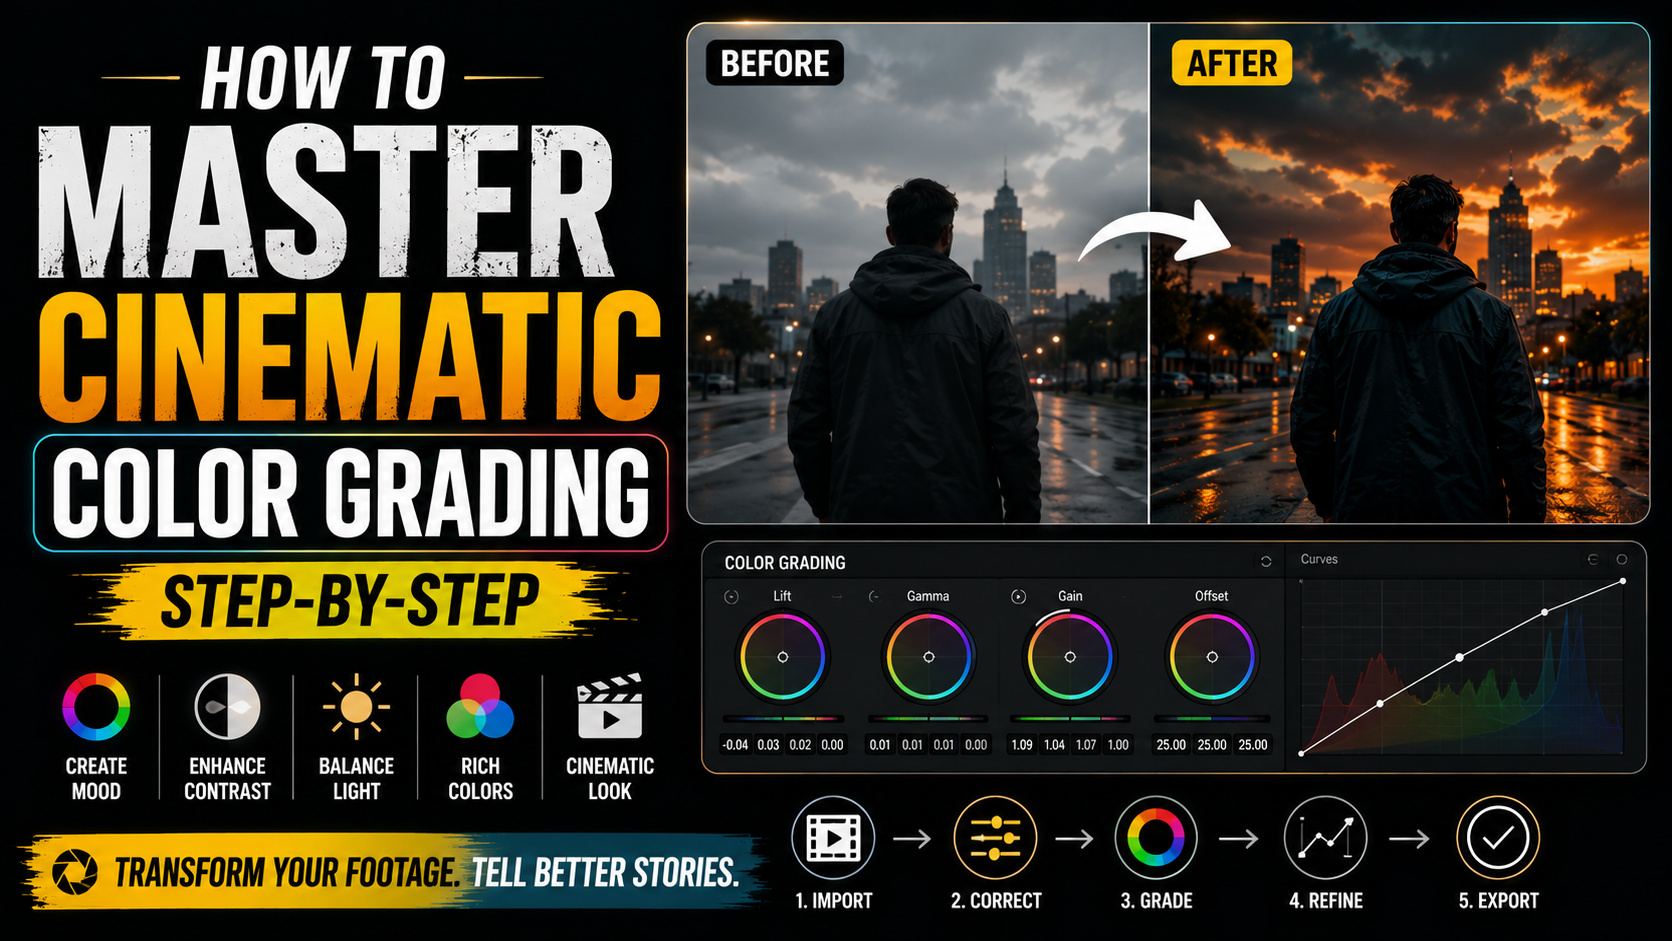
Step-by-Step Cinematic Color Grading Process
Step 1: Decide on a Mood First
Decide on a feeling before touching any sliders — warm and nostalgic, cold and tense, desaturated and gritty. Having a reference image or film in mind makes every decision easier.
Step 2: Adjust Contrast and Black Levels
Lift your blacks slightly instead of leaving them pure black — this is a classic trick that softens the image and adds depth.
Step 3: Push Shadows and Highlights in Opposite Directions
The “orange and teal” look so common in films works because warm skin tones (orange) contrast against cooler backgrounds (teal/blue). Try pushing shadows toward blue and highlights toward warm orange using your color wheels.
Step 4: Add Film Grain or Texture
A subtle grain overlay removes that overly “clean” digital look and adds texture similar to real film stock.
Step 5: Use a LUT as a Starting Point, Not the Final Answer
LUTs (Look-Up Tables) are preset color profiles that apply a base style instantly. Use them as a starting point only — always fine-tune afterward so your footage doesn’t look like everyone else’s.
Common Mistakes to Avoid
- Over-saturating colors — cinematic doesn’t mean cartoonish; subtlety sells the look.
- Skipping color correction — grading on top of bad exposure just amplifies the problems.
- Relying entirely on LUTs — applying one without adjustment often looks flat or mismatched.
- Ignoring skin tones — no matter how stylized your grade is, skin should still look natural.
- Grading on an uncalibrated screen — what looks great on your laptop might look very different elsewhere.
Practice Tip: Study Films Frame by Frame
Pause a movie you love during a calm, well-lit scene and study the tones — where the warmth sits, how deep the shadows go, whether skin tones lean warm or neutral. Recreating just one frame from a favorite film is one of the fastest ways to train your eye for this skill.
Frequently Asked Questions
Q: What’s the easiest software to learn cinematic color grading?
DaVinci Resolve is widely considered the best starting point since it’s free and used professionally, with a dedicated Color page built specifically for this.
Q: Do I need expensive equipment for cinematic color grading?
No. Grading happens in software, not on camera gear. Even smartphone footage can be graded to look cinematic with the right adjustments.
Q: What is the orange and teal look, and why is it so popular?
It’s a grading style that pushes skin tones warm (orange) and backgrounds/shadows cool (teal), creating natural visual contrast that’s pleasing to the eye.
Q: Should I use LUTs or do manual grading?
LUTs are great for speed and consistency, but manual grading gives more control. Most professionals use LUTs as a base, then manually fine-tune from there.
Q: How long does it take to learn cinematic color grading?
Basics can be learned in a few weeks of practice. Mastering it like a professional colorist can take months or years, but you’ll see noticeable improvement within your first few projects.
Final Thoughts
Cinematic color grading is one of the most underrated skills in video editing — it’s the difference between footage that looks “fine” and footage that looks intentional, polished, and professional. Start with clean footage, choose a mood, apply the orange-and-teal or your preferred direction, and always fine-tune rather than relying on presets alone.
Pick one clip you’ve already filmed, try the steps above, and see the difference for yourself. If this helped you, save it for your next editing session — and share it with a fellow creator who’s still wondering why their footage doesn’t “pop” like the pros.


Leave a Reply